After installation - Common issues and process
After installation and registration is completed, users will be logging in with the default username/password. UN: sysadmin PW: omniadmin
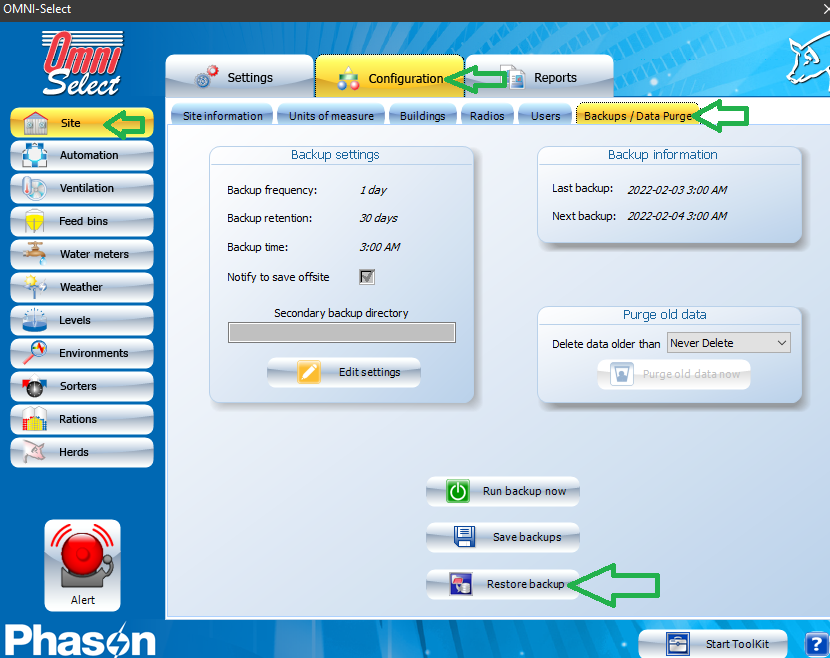
Once they open and enter into the software, they will either need to restore a previous backup, or set everything up from scratch. This article will not cover new setup processes, as this can be found within the appropriate Software user manual. There are two methods to restore a previous backup, the first can be accessed within the software itself by clicking "Site" > "Configuration" > "Backups / Data Purge" and then "Restore backup" where they will need to navigate to where their valid backup is stored. 
Alternatively, they can access the DBRestore utility without having the software open at all, by navigating to where the software is installed and launching the "DBRestore.exe" utility. Default installation location is "C:\Program Files (x86)\Phason\OmniSelect".
The DB restore process is usually pretty problem free, however you may run into the odd error during restore. Some of these errors may be due to the Database file chosen to be restored being corrupt of invalid. For this, you may need to locate and older backup, or reprogram from scratch. Another common error is that the database file being restored was saved last using a postgreSQL version that is higher, than the current version being installed. In these situations it's best to just uninstall all 3 components of OMNI, and reinstall using the most up to date version from the website. The three components of OMNI can be manually uninstalled via the Add/Remove Programs tool within Windows.
Once the database has been successfully restored, and your ready to configure communications, ensure that the RS484-FD windows drivers have been installed, if not they can be located at https://www.phason.ca/rs-485-communication.htm on the right hand side under "Downloads" is the Windows Drivers link.
After these are successfully installed, more than likely we will need to assign the correct comm port in order for communications with all the devices to be restored. The best way to determine the current comm port used and select it is to do the following:
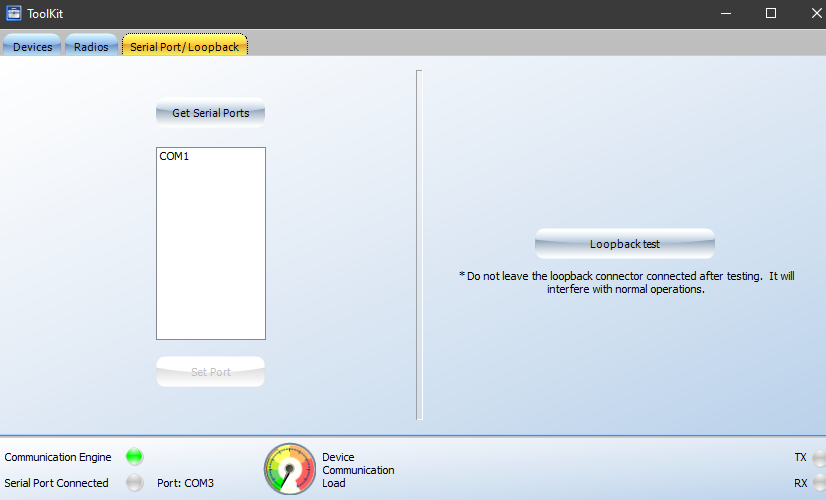
-Within OMNI, click on "Start Toolkit" in the bottom right hand corner. At this point you should see all of the devices listed, which more than likely will not be communicating. Now go to the "Serial Port/Loopback" tab, and click on "Get serial ports". This will list ALL of the available serial port devices their PC sees. Make a mental note of each one listed, then ask the customer to look at their RS485-FD and see if the Power light is on. If the power light is on, then the computer should be seeing the RS485-FD and we can assume it's one of the available serial ports. At this point, have them unplug the USB cable from the RS485, the power light should go off. Then, have them click "get serial ports" again, and one of the COM ports should be missing from the list. This will be our RS485-FD, plug the USB cable back, click Get Serial Ports, select the COM port that has popped back on the list, and then click "Set Port". The RS485-FD and OMNI should now be talking!
To confirm, go back to the "Devices" tab, click "Reset hit rate" and then "Check for all devices". All of the devices should start responding with a hit rate. At this point if all, or some of the controls are not communicating, the problem is more than likely a communication wiring issue. These issues can be complicated to troubleshoot, but will require physical intervention to fix. Make use of the Loopback test in order to confirm physical layer wiring from start, to the point where the loopback is installed.
Loopback connectors should come with the RS485-FD, however are typically thrown out over time. Therefore you can make your own loop back tester simply by getting two jumper wires and jumping channel A to channel C, and channel B to channel D at the point where you wish to test to. I would suggest removing the green communication connector from the device where you are testing to, as well as removing the set of wires going to the next device. This will prevent the control, or the rest of the channel from interfering with the test. There should be more information regarding loop back testing within the manuals for RS485-FD and PCH.
Another factor to consider when troubleshooting devices not communicating after restore is that the device addresses at the time of the backup differ from the device addresses currently in use. In order to confirm this, user will need to walk through the site and write down each address on the sticker of each device, as well as a unique identifier for that device such as the room name so it can be cross referenced correctly with OMNI. If any discrepencies are found, simply modify the address from the "Configuration" menu for the module in question, using the "Edit XYZ" button.
Very rarely, you may run into a situation where a devices active address differs from the sticker on the device. This situation can be difficult to solve, until you can narrow it down to a single device that is left not communicating. If this is the case, use the "Auto Search" function within the Toolkit. This will shut down normal OMNI communications, and send discovery packets out to the field, upon receiving them, devices should answer back and start to populate the "Discovered device address" list. Here you will see a column labeled "In OMNI", this should show a "Yes" value for every address currently assigned in OMNI, and a "No" value if it is not currently assigned in OMNI. Now if you happen to see a return found for a "No" response, this is most likely your phantom address!
If you happen to find a phantom address, and know which control it belongs to. (it is important to verify through process of elimination that it for sure belongs to a device or you risk sending the wrong settings to the wrong device) The next step is to go to the control that you know this address belongs to, and from the Configuration menu, edit the device to change the communication address. Now that that particular control is being recognized and communicating with the new address, it is a good idea to change the actual address on the device itself to match what it SHOULD be on it's sticker. Remembering that editing the address in configuration is simply editing the address for the 'container' object in OMNI.
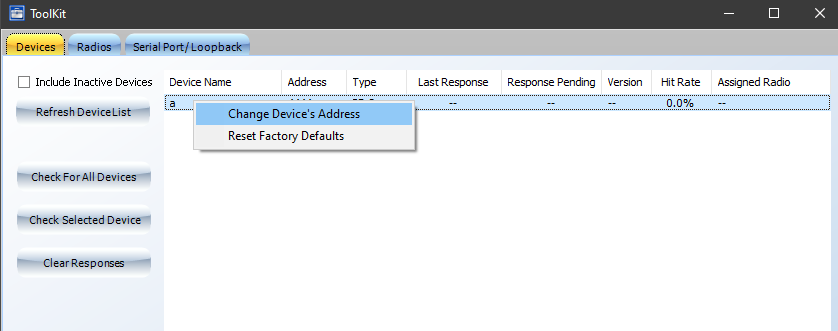
In order to change the actual communication address in OMNI, one must go to the Tool kit, right click on the device, and then click on "change device's address".
Proceed to change the address from the rogue address, to the address indicated on the device's communication address sticker. This will ensure that there is end to end consistency.
Most other communication issues can be solved by the following:
-Wiring issue (broken/wrong color)
-End of line shunts in wrong location
-Damaged network chip (swap in new kit)
Related Articles
Touch screen issues with 1st generation AFX
If you are having issues with your 1st generation AutoFlex touch screen, follow the link below to find a troubleshooting flow chart to help diagnose and fix the issue. https://phason.ca/img/kb/006/touchscreen-issues-gen1.htmlBlank screen issues
If you are experiencing a blank screen on your AFX Connect controller, follow the link below to find a troubleshooting flow chart to help diagnose and fix the issue. www.phason.ca/img/kb/007/007-blank-screen.htmlStuck on PHASON screen
The most common reason for a unit to be stuck on the PHASON screen during boot up is issues reading the PHASON USB. This could be a sign that your PHASON USB has become write protected, or damaged, and the computer is getting stuck trying to read it. ...How do I display both temperature probes?
See Selecting Display Options section of the ECC-1 installation guide.Controller not responding to touch - How can I fix it?
Follow the link below to find a flowchart to help diagnose and solve the issue. https://phason.ca/img/kb/006/touchscreen-issues-gen1.html